
Poor storage wastes valuable space, creates safety hazards from unstable stacks, and accelerates equipment wear through improper contact between metal surfaces.
What I usually look at first is where the equipment ends up after a workout. If weights, bands, and mats do not have an easy place to go, the room starts feeling messy fast, and it becomes harder to use consistently. With the home fitness equipment market reaching $13.57 billion in 2026, manufacturers now offer sophisticated storage systems for every budget and space.
This guide covers commercial products and DIY solutions to help you reclaim your workout space.
Your Quick Summary
- Allocate 15-25% of total gym space for storage before buying equipment
- Wall-mounted systems free up 30-40% more floor space than freestanding options
- DIY solutions start at $50-$200; commercial-grade systems run $300-$500+
- Keep frequently-used items at waist-to-shoulder height and match storage to equipment type
- Vertical storage works well for small spaces while protecting expensive gear
Overview of Home Gym Storage in 2026
Dumbbells scattered across your floor, resistance bands tangled in corners, weight plates leaning against walls. Home gym clutter eats up space fast. Without smart storage, even a dedicated workout room becomes unusable.
When I’m looking at home gym storage, I don’t just think about where the equipment can fit. I look at how easy it is to grab, put back, and move around without the room feeling crowded.
That matters because most people are trying to make a workout area fit into a room that already has other limits. Modern storage now serves dual purposes: units that function as workout benches, decorative furniture pieces that hide equipment, and rack-integrated systems that eliminate standalone storage footprints entirely.
As the fitness equipment market grows at 6.81% annually, solutions now exist for every budget tier and space constraint.
Whether you're organizing a 110-square-foot apartment gym or a 300-square-foot garage setup, this guide covers vertical racks, modular systems, hidden storage, and multi-functional pieces that keep equipment accessible without sacrificing floor space.
Types of Home Gym Storage Solutions
Freestanding Storage Systems
Weight trees, dumbbell racks, and plate storage towers offer portable organization without wall installation. Standard plate trees hold up to 1,000 lbs in a 24.5" x 24.5" footprint, with many models featuring locking caster wheels for mobility.
Advantages:
- No drilling or permanent installation required
- Renter-friendly and relocatable
- Easy to reposition as your gym layout evolves
- Immediate setup with no tools
Drawbacks:
- Consumes valuable floor space
- Less stable than wall-mounted options for heavy loads
- Can tip if not properly weighted or anchored
Wall-Mounted Storage
Wall-mounted plate racks, barbell holders, and vertical systems reclaim floor space by using your walls. Proper anchoring is essential: drywall alone cannot hold the load and will fail, potentially injuring anyone nearby. Residential walls typically have studs spaced 16 inches on center.
Critical installation requirements:
- Anchor into studs, never drywall alone
- Use appropriate lag screws (typically 3/8" x 2.5")
- Verify weight capacity matches your equipment load
- Consider a horizontal stringer board to distribute weight across multiple studs
These systems work best in permanent home gyms where keeping floor space clear is the priority. For spaces where walls aren't available or you want equipment mobility, rack-integrated options offer another approach.
Rack-Integrated Storage
Power racks and squat stands with built-in or attachable storage eliminate the need for separate storage units. These systems secure plate holders, barbell storage, and accessory attachments directly to the rack frame using simple mounting hardware.
Key benefits:
- Consolidates equipment and storage into one footprint
- No additional floor space required beyond the rack itself
- Keeps weights within arm's reach during workouts
For small spaces under 150 square feet, rack-integrated storage makes good use of what you have.
Overhead and Ceiling Storage
When floor and wall space run out, look up. Ceiling-mounted barbell storage and overhead accessory racks use unused vertical space for lighter equipment like resistance bands, jump ropes, and single barbells.
Safety considerations:
- Verify ceiling joist locations and spacing
- Never exceed manufacturer weight ratings
- Make sure there's adequate clearance for overhead movements
- Use only in spaces with 8+ foot ceilings
Multi-Purpose Storage Furniture
Storage benches that double as workout benches, ottomans with hidden compartments, and cabinets that blend with home décor offer discreet organization for multi-purpose spaces. These solutions work particularly well in spare bedrooms, living rooms, or home offices where equipment visibility is a concern.
Best Storage Solutions by Equipment Type
Different equipment needs different storage for safety, accessibility, and space. Here's how to organize each category effectively.
Dumbbell Storage
Horizontal vs. Vertical Racks:
- A-frame racks: Accommodate 5-10 pairs in corners or along walls
- 3-tier horizontal racks: Handle 10-15 pairs; commercial-grade models hold 1,000 lbs
- Wall-mounted saddles: Minimal footprint for 2-4 pairs
| Storage Type | Capacity | Footprint | Price Range |
|---|---|---|---|
| A-frame rack | 5-10 pairs | 24" x 30" | $100-$200 |
| 3-tier horizontal | 10-15 pairs | 48" x 24" | $200-$400 |
| Wall-mounted saddles | 2-4 pairs | 12" x 6" per pair | $50-$150 |
When deciding between formats, choose vertical racks if floor space is limited. Horizontal racks provide easier access for frequent weight changes during workouts.
Weight Plate Storage
Storage options:
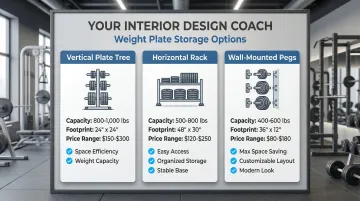
- Plate trees: Vertical posts with pegs; compact 24" x 24" footprint
- Horizontal plate racks: Ground-level storage; easier loading but larger footprint
- Wall-mounted pegs: Good space use; requires stud mounting
Organize plates by size with heaviest at bottom for stability.
Standard residential plate trees support 1,000 lbs and often include integrated barbell sleeves for storing Olympic bars alongside your plates.
| Storage Type | Capacity | Footprint | Price Range |
|---|---|---|---|
| Vertical plate tree | 800-1,000 lbs | 24" x 24" | $150-$300 |
| Horizontal rack | 500-800 lbs | 48" x 30" | $120-$250 |
| Wall-mounted pegs | 400-600 lbs | 36" x 12" | $80-$180 |
Barbell and Bar Storage
Options:
- Vertical wall mounts save floor space and hold 4-6 bars
- Gun racks with UHMW plastic inserts protect bar knurling when stored horizontally
- Freestanding holders offer portability but consume valuable floor space
Space bars 6-8 inches apart to prevent contact damage. Vertical storage works best for spaces under 200 square feet.
Kettlebell Storage
Floor racks vs. wall-mounted:
- 3-tier floor racks work well for collections of 8+ kettlebells
- Wall-mounted shelves save floor space but need secure installation into wall studs
- Simple floor storage is fine for smaller collections of 3-5 kettlebells
Use rubber mats underneath to prevent floor damage and absorb the micro-vibrations that cause kettlebell bases to creep on hard flooring.
Resistance Bands, Jump Ropes, and Small Accessories
Small items create the most clutter. Storage solutions that keep accessories organized include:
- Pegboards: Customizable hook placement; 24" x 48" boards hold 20+ items
- Wall hooks: Simple and affordable ($1-$3 per hook)
- Storage bins: Clear containers for visibility
- Drawer systems: Organized compartments for bands, clips, and chalk
Label bins and give each item type its own hook. Otherwise, bands, clips, and jump ropes usually end up on the nearest open hook, and the system stops being easy to use.
Cardio Equipment Storage
Yoga mats, foam rollers, and medicine balls:
- Vertical mat storage: Wall-mounted racks hold 4-6 mats
- Bin systems: Rolling bins for balls and rollers
- Wall-mounted cradles: Foam roller holders at 5-6 feet height
Store mats vertically to prevent creasing and maintain shape.
Space-Saving Storage Ideas for Small Home Gyms
Small home gyms under 150 square feet present a real storage challenge: how do you keep weights, bands, and equipment accessible without creating clutter? The answer lies in vertical planning and multi-functional storage that makes the most of every inch.
Vertical Storage Strategies
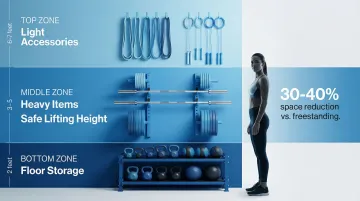
Use wall space from floor to ceiling with multi-level systems:
- Mount heavier items (plates, bars) at 3-5 feet for safe lifting
- Place lighter accessories (bands, ropes) at 6-7 feet
- Use lower space (under 2 feet) for kettlebells and medicine balls
According to Plan7Architect's home gym size guide, vertical storage can reduce your gym's footprint by 30-40% compared to freestanding options. When the floor is clear, the gym feels usable from the moment you walk in rather than requiring a five-minute setup before every session.
Corner Storage Solutions
Once you've worked through wall space, turn to corners, often the most underused areas in home gyms.
Corner-specific solutions include:
- Triangular plate racks that fit 300-500 lbs in tight spaces
- A-frame dumbbell stands with 45-degree angles designed for corner geometry
- Vertical barbell holders mounted in corners to store 3-4 bars upright
Behind-Door and Hidden Storage
For multi-purpose rooms where gym equipment needs to disappear, consider these options:
- Over-door hooks for resistance bands and jump ropes
- Fold-down storage racks that mount flush when not in use
- Cabinet systems with doors that hide equipment when guests arrive
If you're struggling to picture how these storage solutions fit your specific space constraints, an interior design coach can help you plan efficient layouts that work with your room's unique dimensions. If you're stuck on which direction to take, call 408-306-5003 for a free consultation - we can help you figure out what makes the most sense for your space.
Adjustable and Modular Systems
Modular storage grows with your equipment collection:
- Add-on plate pegs for expanding weight sets
- Stackable dumbbell rack tiers
- Pegboard systems with movable hooks
These systems mean you won't need to replace storage as your gym evolves.
Consider dual-purpose furniture that serves as both storage and functional gym equipment:
- Storage benches with internal compartments for accessories
- Ottoman storage for resistance bands and yoga blocks
- Furniture-grade cabinets that blend with home décor while hiding equipment
These pieces work especially well in living rooms, bedrooms, or basements where your gym shares space with other activities.
DIY vs. Commercial Storage Solutions
DIY Storage Options
Budget-friendly projects offer 50-70% cost savings:
- PVC pipe dumbbell racks: $30-$50 in materials
- 2x4 lumber plate storage: $40-$80 for wood and hardware
- Pegboard accessory walls: $50-$100 for board and hooks
DIY storage caddies cost $100-$300 versus $500+ for comparable commercial units.
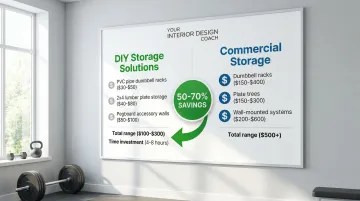
The trade-off? You'll invest 4-8 hours per project and need basic carpentry skills.
Best DIY applications:
- Accessory storage (bands, ropes, small items)
- Light to moderate weight storage (under 300 lbs)
- Temporary or changing gym setups
Commercial Storage Products
While DIY works for lighter gear, heavy equipment calls for commercial-grade solutions.
Invest in commercial storage for:
- Heavy equipment storage (500+ lbs)
- Long-term, permanent installations
- Safety-critical applications (overhead storage, wall-mounted heavy racks)
Commercial-grade steel racks rated for 1,000 lbs provide certified safety that DIY wood projects cannot guarantee.
Quality commercial storage pricing:
- Dumbbell racks: $150-$400
- Plate trees: $150-$300
- Wall-mounted systems: $200-$600
Hybrid Approach
The most cost-effective approach combines both:
- Commercial storage for primary equipment (dumbbells, plates, barbells)
- DIY solutions for accessories and lighter items
- Start with commercial for safety-critical items, add DIY as budget allows
How to Choose the Right Storage for Your Home Gym
Assess Your Equipment Inventory and Future Growth
I usually recommend starting with a full inventory before buying anything.
- List all weights, bars, and accessories
- Measure total weight capacity needed
- Note equipment dimensions
Plan for 20-30% more capacity than current needs. Most gym collections grow within 12 months, and under-rated storage fails under overloading, which is both a safety risk and an equipment expense. Building in that headroom from the start means you won't be reorganizing your entire storage system every time you add a piece of equipment.
Measure Your Available Space
Take precise measurements of your space.
- Floor space available for freestanding storage
- Wall space and stud locations for mounted systems
- Ceiling height for overhead storage (minimum 8 feet recommended)
- Door clearances and traffic flow patterns
Once you've mapped your dimensions, apply the 70-80% workout / 20-30% storage rule. A 150-square-foot gym should dedicate 30-45 square feet to storage.
If you're struggling to picture how equipment and storage will fit together, I can help you work out your layout before you purchase storage systems. Reach out for a free consultation at 408-306-5003. Sometimes one conversation is all it takes to get unstuck.
Consider Your Budget and Timeline
Storage budgets by gym size.
- Small gym (under 150 sq ft): $200-$400
- Medium gym (150-250 sq ft): $400-$800
- Large gym (250+ sq ft): $800-$1,500+
Phase purchases to spread costs:
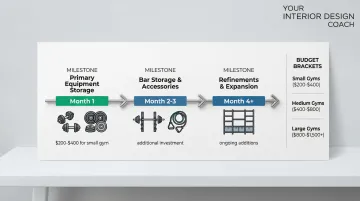
- Month 1: Primary equipment storage (dumbbells, plates)
- Month 2-3: Bar storage and accessory organization
- Month 4+: Refinements and additional capacity
Evaluate Installation Requirements
Beyond budget, consider your installation constraints.
Renter-friendly solutions:
- Freestanding racks and trees
- Tension-mounted systems
- Furniture-style storage
Permanent installations:
- Wall-mounted systems requiring stud anchoring
- Ceiling-mounted storage
- Integrated rack systems
Professional installation costs $50-$150 per hour. Complex wall-mounted systems may justify professional installation for safety and warranty protection.
Planning and Installing Your Storage System
Create a Floor Plan and Layout
I usually recommend sketching the layout before buying storage. This planning phase prevents costly mistakes and makes sure everything has its place.
- Position frequently-used equipment at waist-to-shoulder height (3-5 feet)
- Place seasonal or rarely-used items higher (6-7 feet) or lower (under 2 feet)
- Maintain 2-3 feet of clearance around each piece of equipment (recommended by space planning experts)
Account for these typical equipment footprints:
- Treadmill/bike: 20-30 sq ft
- Squat rack with working area: 65-85 sq ft
- Weight bench with clearance: 40-65 sq ft
Installation Best Practices
Safety comes first when mounting storage systems. Follow these guidelines:
- Always anchor wall-mounted storage to studs, never drywall alone
- Use manufacturer-specified hardware, typically 3/8" lag screws for heavy loads
- Verify weight capacity exceeds your equipment load by at least 20%
- For freestanding units over 6 feet tall, use tip-over prevention anchors
Once your storage is installed, create a logical organization system:
- Label storage zones by equipment type
- Organize by frequency of use (daily items most accessible)
- Create a "home" for every piece of equipment
- Use color coding or labels for quick identification
Maintenance and Organization Tips
A storage system only works if it is easy to reset. After each workout, the goal should be simple: weights go back where they belong, small accessories do not get mixed together, and anything loose is easy to put away in a few minutes. Make sure to:
- Tighten mounting hardware every 6 months
- Inspect for wear or damage monthly
As your fitness routine evolves, adjust accordingly:
- Adjust storage configuration as equipment collection changes
- Replace worn contact points (rubber, foam) that protect the equipment
- Update labels when reorganizing zones
Your Quick Recap
When equipment is scattered around, the room becomes harder to start using. You have to clear space before you can even work out, and that extra step makes it easier to skip the session altogether.
- Allocate storage space before you buy equipment, not after it piles up
- Wall-mounted systems free up the floor area you actually work in
- Safety anchoring is not optional for heavy wall storage - it is load-bearing
- Vertical zoning means heavy items low, light accessories high
- Phase your storage budget like you phase your equipment - start with what you use daily (bonus insight)
- DIY storage for accessories plus commercial storage for heavy gear is the most cost-effective hybrid (bonus insight)
If you're still feeling stuck and haven't been able to move things forward, let's talk! Reach out for a free consultation at 408-306-5003, and we can take it from there.
Frequently Asked Questions
How much space do I need for home gym storage?
Allocate 15-25% of your total gym space for storage. A small gym of 110-160 sq ft needs 20-30 sq ft, while medium gyms (160-270 sq ft) need 40-60 sq ft, and large gyms over 270 sq ft require 80+ sq ft.
What's the best way to store dumbbells in a small space?
Vertical A-frame racks or wall-mounted saddle racks offer the smallest footprint. A-frame racks hold 5-10 pairs in about 24" x 30" of floor space, while wall-mounted saddles use minimal space and keep dumbbells accessible without sacrificing workout area.
Should I invest in wall-mounted or freestanding storage?
Wall-mounted storage keeps the floor clear and provides better stability, making it ideal for permanent gyms. Freestanding storage works well when you need portability or do not want anything permanently installed.
How can I organize my home gym on a budget?
Start with DIY solutions for accessories, pegboard walls cost $50-$100, and PVC dumbbell racks run $30-$50. Invest in commercial-grade storage for heavy weights where safety matters. A typical DIY approach costs $200-$400 for a small gym.
What storage solutions work best for garage gyms?
Use weather-resistant materials and wall-mounted systems to keep equipment off damp floors. Metal storage with powder-coat finishes resists humidity better than wood, while covered bins protect accessories from temperature fluctuations and dust.
How do I prevent equipment damage during storage?
Use rubber or foam contact points to prevent scratching, and space items adequately (bars 6-8 inches apart, plates on mats rather than concrete). Avoid overloading racks beyond their rated capacity to prevent damage to both storage and equipment.
Your Quick Recap
A cluttered gym does not just look bad - it actively reduces how often you use it. When finding equipment becomes a chore, workouts get skipped. The real return on smart storage is not just organization; it is consistency. And consistency is what actually produces results.
- Allocate storage space before you buy equipment, not after it piles up
- Wall-mounted systems free up the floor area you actually work out in
- Safety anchoring is not optional for heavy wall storage - it is load-bearing
- Vertical zoning means heavy items low, light accessories high
- Phase your storage budget like you phase your equipment - start with what you use daily (bonus insight)
- DIY storage for accessories plus commercial storage for heavy gear is the most cost-effective hybrid (bonus insight)
If you're still feeling stuck and haven't been able to move things forward, let's talk! Reach out for a free consultation at 408-306-5003, and we can take it from there.