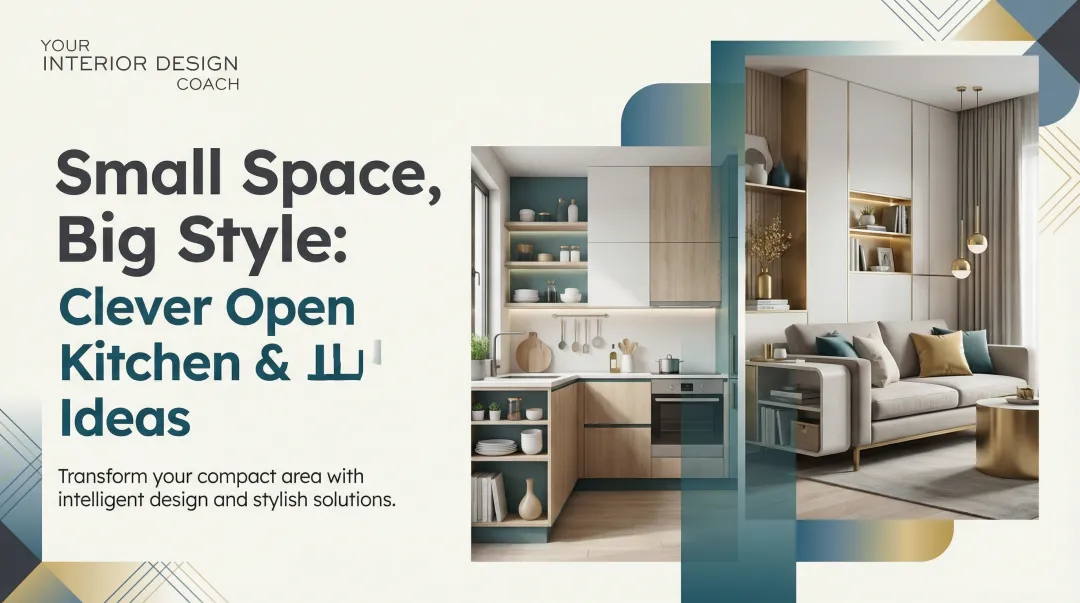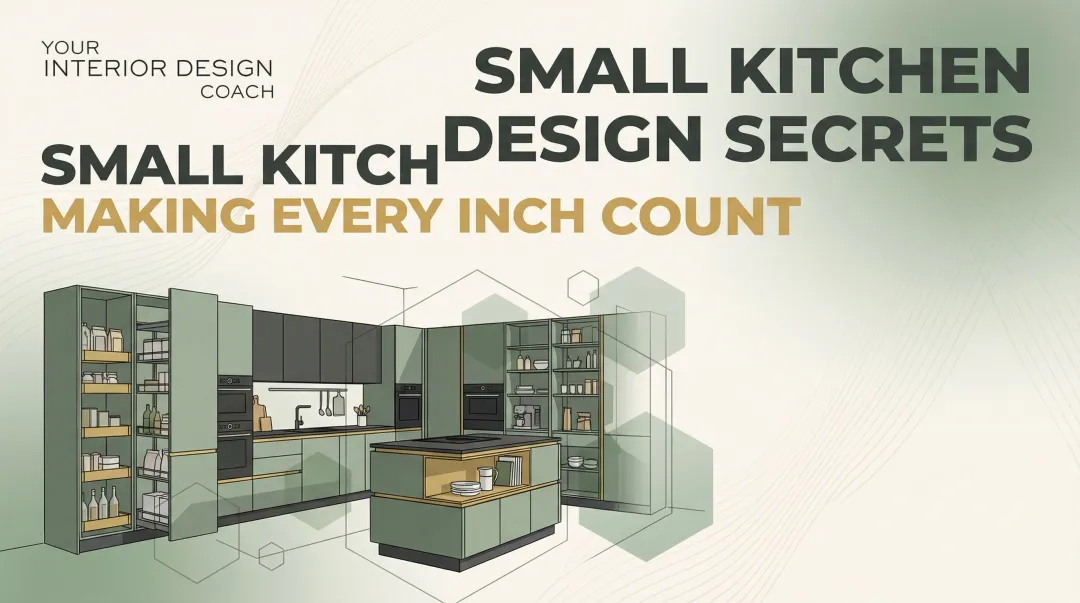
I always remind clients that a small kitchen is not automatically a bad kitchen. It just has less room for choices that do not serve a purpose. When the layout, storage, lighting, and appliances are thought through together, the space can feel much easier to use.
Here are 15 ideas I would look at when a small kitchen feels crowded, short on storage, or harder to use than it should to help you get the most from every inch of your small kitchen.
Your Quick Summary
- Extend cabinets to the ceiling for 30-50% more storage
- Use light colors and reflective surfaces to visually expand your space
- Choose compact appliances (18" dishwashers, 24" ranges) for tight spaces
- Maintain 42-48 inches of clearance in work aisles for safe, comfortable movement
- Layer lighting (task, ambient, accent) to brighten and open up the room
Smart Storage Solutions to Maximize Every Inch
In a small kitchen, I usually look at storage first. Not because you need more cabinets everywhere, but because the right things need to be easy to reach and easy to put away.
Idea 1: Install Floor-to-Ceiling Cabinetry
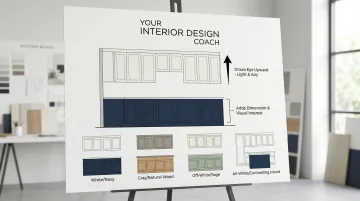
Extending cabinets all the way to the ceiling is one of the most effective storage upgrades in a small kitchen. Floor-to-ceiling cabinets increase storage capacity by 30-50% by capturing the vertical space above standard 36-inch units that would otherwise sit empty. As a bonus, the continuous vertical line also makes ceilings appear higher and the room larger.
Smart organization strategy:
- Store rarely-used items (holiday platters, specialty appliances) on top shelves
- Keep everyday essentials at mid-level for easy access - when daily cookware is within immediate reach, meal prep stops being interrupted by cabinet archaeology
- Reserve lower cabinets for heavy items and daily cookware
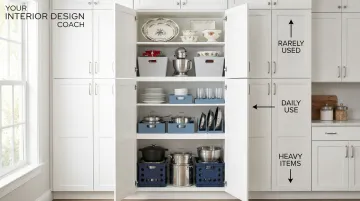
Pro tip: Use a small step stool to access top shelves, or install pull-down shelf systems that bring items within reach.
Idea 2: Incorporate Pull-Out Pantry Cabinets
Narrow pull-out pantries (6-12 inches wide) turn slim gaps into valuable storage. These vertical units slide out to reveal multiple shelves for spices, canned goods, oils, and baking supplies.
Ideal placement:
- Next to the refrigerator for easy access to condiments and beverages
- Beside the range for cooking oils, spices, and seasonings
- In any narrow gap between appliances or at the end of a cabinet run
Pull-out pantries provide surprising storage space in areas that would otherwise be wasted or difficult to access.
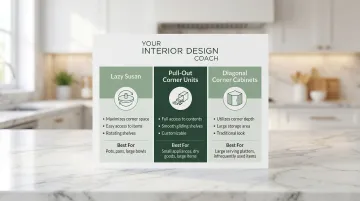
Idea 3: Add Corner Solutions Like Lazy Susans
Corner cabinets often become black holes where items disappear into the back. Lazy susans, pull-out corner units, or LeMans-style systems transform these awkward spaces into functional storage.
Which solution works best:
- Lazy susans: Best for base corner cabinets; ideal for pots, mixing bowls, and pantry items
- Pull-out corner units: Work well when you need full visibility and access to items
- Diagonal corner cabinets: Easier to access than standard corners without specialized hardware
In a small kitchen, corner cabinets cannot become the place where things disappear. If they are hard to reach, you lose storage you technically have but never really use.
Idea 4: Use Drawer Organizers and Dividers
Custom drawer inserts prevent the jumbled mess that makes small kitchens feel chaotic. Organized drawers let you see everything at a glance and maximize usable space.
Essential organizers:
- Cutlery dividers for utensils
- Spice drawer inserts that display labels facing up
- Knife blocks that fit inside drawers
- Adjustable dividers for cooking tools
- Peg systems for pots and pans
The NKBA recommends a total of 1,400 inches of shelf and drawer frontage for kitchens under 150 square feet; proper organization helps you maximize this capacity.
Idea 5: Install Floating Shelves or Open Shelving
Open shelving can make a small kitchen feel less visually heavy than a wall of closed cabinets. This works well when you have beautiful dishware, glassware, or cookbooks to display.
When open shelving works best:
- In place of one or two upper cabinets (not all of them)
- For frequently-used items like everyday dishes and glasses
- When you want to showcase colorful ceramics or vintage finds
- In kitchens with limited natural light where cabinets would create shadows
Keeping it organized:
- Limit items to what you actually use regularly
- Use matching containers or dishware for a cohesive look
- Dust and wipe shelves weekly to prevent buildup
- Avoid overcrowding; leave some breathing room
Layout & Space Planning Ideas That Work
The right layout makes the difference between a cramped, frustrating kitchen and one that flows beautifully despite limited square footage.
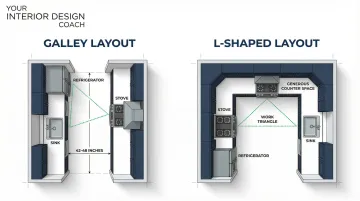
Idea 6: Choose a Galley or L-Shaped Layout
Galley and L-shaped layouts consistently deliver the best functionality in small kitchens because they support the classic work triangle with legs between 4-9 feet - meaning fewer wasted steps during cooking. Galley kitchens use two parallel walls to create an efficient corridor; L-shaped layouts wrap around two adjacent walls and maximize corner space.
The NKBA recommends a minimum aisle width of 42 inches for a single cook and 48 inches for multiple cooks in galley kitchens. In my experience, choosing the right layout at the start is what makes a small kitchen genuinely pleasant to cook in daily - as opposed to one that looks fine in photos but exhausts you every time you use it.
Why these layouts work:
- Maximize continuous counter space
- Create efficient workflows
- Avoid wasted floor area in the center of the room
- Allow for clear traffic paths
Idea 7: Consider a Narrow or Mobile Island
Islands aren't just for large kitchens. A narrow island (24-30 inches deep instead of the standard 36 inches) or a mobile cart can provide extra prep space and storage without overwhelming the room.
Minimum clearances required:
- 42-48 inches between the island and perimeter counters for comfortable movement
- 36 inches for walkways where no work happens
If your kitchen can't accommodate these clearances, consider a narrow console table (18-20 inches deep) against a wall, or a mobile cart you can roll out when needed and tuck away when not in use.
A peninsula attached to existing cabinetry is another space-saving alternative.
Idea 8: Create a Breakfast Nook Instead of Dining Space
Rather than trying to fit a full dining table in or adjacent to your small kitchen, consider a built-in banquette or small bistro table. These options take up less floor space while providing comfortable seating.
Space-saving seating solutions:
- Built-in banquettes with storage underneath the seats
- Wall-mounted drop-leaf tables that fold down when not in use
- Small bistro tables (24-30 inches diameter) with two chairs
- Counter-height seating at a peninsula
For 30-inch high tables, allow 24 inches wide by 18 inches deep of knee space per person. Behind seated diners, allow 32 inches if no traffic passes, or 44 inches if people need to walk past.
Idea 9: Open Up to Adjacent Rooms
Removing a non-structural wall between the kitchen and living or dining room can dramatically change how spacious your kitchen feels. Even a partial opening or pass-through window creates visual continuity and allows natural light to flow between spaces.
Important considerations:
- Consult a structural engineer before removing any wall
- You may lose upper cabinet storage where the wall was removed
- Open layouts require keeping the kitchen tidier since it's always visible
- Consider a half-wall or peninsula to maintain some separation while opening sightlines
Idea 10: Utilize Every Nook and Alcove
Awkward spaces are opportunities in small kitchens. That narrow alcove next to the refrigerator? Perfect for a coffee bar with a small shelf for mugs and supplies. The shallow space at the end of a cabinet run? Ideal for a built-in cookbook shelf or charging station.
Creative uses for odd spaces:
- Narrow gaps (6-9 inches): Slide-out storage for baking sheets and cutting boards
- Shallow alcoves: Coffee stations, wine racks, or display shelves
- Space above the refrigerator: Wine storage or decorative baskets
- End-of-cabinet sides: Magnetic knife strips, hooks for mugs, or small shelves
Color & Light Strategies to Expand Visual Space
Color and lighting have to work together in a small kitchen. A lighter cabinet color helps, but it will not do much if the counters are still shadowed or the corners feel dark.
Idea 11: Use Light, Neutral Color Palettes
Whites, soft grays, pale blues, and warm beiges reflect light and make walls recede visually. Designers recommend upper cabinet colors with a Light Reflectance Value (LRV) between 55 and 85 to get the most from the light-expanding effect.
Top color choices for small kitchens:
- Pure white or off-white for maximum brightness
- Soft gray with warm or cool undertones, depending on your lighting
- Pale sage or mint for subtle color without heaviness
- Warm cream or beige in kitchens with abundant natural light
Always test paint samples on your actual walls first. Observe them at different times of day. The same color can look dramatically different depending on your lighting conditions.
Idea 12: Install Reflective Backsplashes
Glossy tile, glass subway tile, or mirrored backsplashes bounce light around the room, creating depth and brightness. Behind the range or sink, where your backsplash becomes a focal point, this strategy works especially well.
Materials that reflect light effectively:
- Glossy ceramic or porcelain subway tile
- Glass tile in light colors
- Stainless steel sheets or tiles for modern kitchens
- High-gloss paint as a budget-friendly option
Mirrored backsplashes reflect the most light but show every water spot. For easier maintenance, glass and glossy tile offer similar benefits.
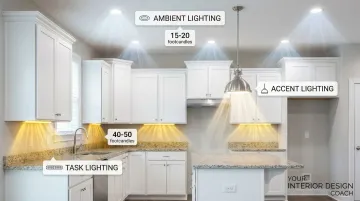
Idea 13: Layer Your Lighting
Small kitchens need good lighting. A single overhead fixture creates shadows and makes the space feel cramped.
Layer three types instead:
Three essential lighting layers:
- Task lighting: Under-cabinet LED strips illuminate countertops for food prep (aim for 40-50 footcandles)
- Ambient lighting: Recessed or flush-mount ceiling fixtures provide overall illumination (15-20 footcandles)
- Accent lighting: Pendant lights over an island or dining area add style and focused light
The Illuminating Engineering Society recommends 40-50 footcandles for task areas and 15-20 footcandles for ambient lighting in kitchens. When shopping for LED strips or bulbs, look for these lumen ranges to achieve proper lighting levels.
Cabinetry & Hardware Choices for a Sleek Look
Cabinet style and hardware significantly impact how spacious and modern your small kitchen appears.
Choose Streamlined, Handle-Free Cabinets
Push-to-open cabinets or minimal hardware creates clean, uninterrupted lines that make cabinetry feel less bulky. The contemporary approach works especially well in modern and transitional kitchens.
Handle-free options:
- Push-to-open mechanisms (touch to open, touch to close)
- Recessed pulls integrated into the cabinet door edge
- Horizontal grooves routed into door fronts
If you prefer traditional hardware, choose low-profile options like slim bar pulls or small knobs that don't overwhelm small cabinet doors.
Paint Cabinets in High-Gloss Finish
High-gloss cabinet finishes reflect light similarly to mirrors, making the kitchen feel brighter and more spacious. This works particularly well on upper cabinets where the reflective surface bounces light throughout the room.
Maintenance considerations:
- Shows fingerprints and smudges more readily than matte finishes
- Requires regular cleaning with mild glass cleaner and soft cloths
- Avoid abrasive cleaners that can scratch the glossy surface
If high-maintenance finishes concern you, consider using high-gloss on upper cabinets only, with a more forgiving satin or matte finish on base cabinets that get touched more frequently.
Use Glass-Front Cabinet Doors Strategically
Glass-front doors make upper cabinets feel less heavy and visually imposing. They work best when you have attractive dishware or glassware to display, creating visual interest without clutter.
Best practices for glass-front cabinets:
- Use on 1-2 upper cabinets, not all of them
- Display coordinated dishware in matching colors
- Add interior cabinet lighting to highlight contents
- Keep items organized and dust-free (the contents are always visible)
Place glass doors flanking a window or range hood to break up a long run of solid cabinet doors.
Install Two-Toned Cabinetry
Using lighter colors on upper cabinets and slightly darker tones on lower cabinets adds dimension and visual interest. This approach prevents the space from feeling monotonous while keeping the upper portion of the room light and airy.
Popular color combinations:
- White uppers with navy or charcoal gray lowers
- Soft gray uppers with natural wood-tone lowers
- Off-white uppers with sage green lowers
- All-white with a contrasting island in a deeper color
The lighter upper cabinets draw the eye upward and prevent the kitchen from feeling top-heavy.
Select Slim, Modern Hardware
Oversized hardware can overwhelm small cabinet doors and drawers. Choose properly sized hardware that complements rather than dominates.
Hardware guidelines for small kitchens:
- Bar pulls: 3-4 inches for drawers, 5-6 inches for cabinet doors
- Knobs: ¾ to 1¼ inches in diameter
- Finish: Brushed or matte finishes show fewer fingerprints than polished
- Style: Simple, clean designs rather than ornate or bulky options
Consistent hardware throughout the kitchen creates visual cohesion that makes the space feel more organized and intentional.
If you’re stuck on cabinet colors, hardware, or finishes, I can help you sort through the choices based on how you use your kitchen, your budget, and the look you want. Call 408-306-5003 for a free consultation, and we can take it from there.
Appliances & Fixtures Sized for Small Spaces
I highly recommend choosing appliances that suit the kitchen's scale rather than trying to fit full-sized pieces into a compact layout. Oversized fixtures can make the space feel crowded and harder to move through, while the right proportions help the kitchen feel more open, effortless, and comfortable to use every day.
Idea 13: Choose Compact or Apartment-Sized Appliances
Manufacturers offer high-quality compact appliances designed specifically for small spaces.
18-inch dishwashers hold 10 place settings, 24-inch ranges provide four burners with a standard oven, and counter-depth refrigerators sit flush with cabinetry to save floor space.
Common compact appliance dimensions:
- Dishwashers: 18 inches wide (vs. standard 24 inches)
- Ranges: 24 inches wide (vs. standard 30 inches)
- Refrigerators: 24 inches wide, counter-depth
These space savings come with trade-offs to consider:
- Smaller dishwashers run more frequently for larger households
- 24-inch ranges have less oven capacity (though still adequate for most cooking)
- Counter-depth refrigerators offer less storage than standard-depth models
Weigh these compromises against your space constraints. For many households, standard appliances are worth the footprint. Only downsize if you truly need the extra square footage for other purposes.
Idea 14: Install an Undermount or Integrated Sink
Undermount sinks mount beneath the countertop, creating a seamless edge that makes wiping crumbs directly into the sink effortless. This clean-lined approach reduces visual clutter on the countertop.
Sink sizing for small kitchens:
- Single bowl: 24-30 inches wide (provides maximum basin depth)
- Double bowl: 30-33 inches wide (offers flexibility for washing and rinsing)
- Depth: 8-10 inches (deep enough for large pots without being too deep)
Integrated sinks use the same material as the countertop (solid surface or quartz) to create the most seamless look, though stainless steel undermount sinks are more budget-friendly.
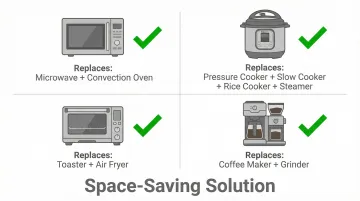
Idea 15: Select Multi-Functional Appliances
Appliances that serve multiple purposes reduce countertop clutter and eliminate the need for separate devices.
A convection microwave replaces both a standard microwave and a second oven, while an Instant Pot combines a slow cooker, pressure cooker, rice cooker, and steamer.
Space-saving multi-function appliances:
- Convection microwave (microwave + convection oven)
- Instant Pot or multi-cooker (pressure cooker + slow cooker + more)
- Toaster oven with air fryer function
- Coffee maker with built-in grinder
Consider creating an appliance garage (a cabinet with a tambour door or lift-up door) to hide small appliances when not in use, keeping counters clear and uncluttered.
Design Details That Make a Difference
Thoughtful finishing touches add personality and polish without consuming precious space.
Idea 13: Add a Bold or Patterned Backsplash
A statement backsplash adds personality and visual interest into a small kitchen without taking up any floor space. This is your opportunity to use color, pattern, or texture that would overwhelm in larger doses.
Choose pattern scale carefully:
- Small-scale patterns (1-2" tiles) create texture without overwhelming
- Medium-scale patterns (3-4" tiles) work well in most small kitchens
- Large-scale patterns (6"+ tiles or slab) can work if the pattern is subtle
Limit bold patterns to the backsplash area only, keeping cabinets, counters, and walls neutral to prevent visual chaos.
Idea 14: Use Minimal Window Treatments
Heavy curtains or bulky blinds make small kitchens feel closed in and block precious natural light. If privacy allows, leave windows bare to maximize light and views.
When you do need coverage, keep it simple:
- Simple Roman shades in light fabrics
- Café curtains covering only the bottom half of windows
- Sheer curtains that filter light without blocking it
- Cellular shades in white or light colors
If your kitchen window faces a neighbor's window or a street, consider bottom-up shades that provide privacy while allowing light in from the top portion of the window.
Idea 15: Incorporate One Statement Light Fixture
The right light fixture completes your small kitchen design. A sculptural pendant light or small chandelier over an island, peninsula, or dining area serves as functional art, drawing the eye upward and emphasizing ceiling height.
| Location | Sizing Guideline |
|---|---|
| Over islands | 12-20 inches wide for small kitchens |
| Over dining tables | Fixture diameter should be ½ to ⅔ the table width |
| Hanging height | Position 30-36 inches above countertops or tables |
| Design style | Choose fixtures with open or transparent designs to avoid blocking sightlines |
One beautiful fixture makes more impact than multiple generic ones, and it creates a focal point that elevates the entire kitchen design.
Bringing It All Together: Making Smart Design Decisions
The best small kitchen design comes from understanding your specific needs, cooking habits, and style preferences, not just following trends.
Consider these questions: Do you cook elaborate meals daily or primarily reheat and assemble? Do you entertain frequently or prefer quiet dinners? Do you have extensive dishware collections or minimal kitchen tools? Your answers should drive your design decisions.
Making all these choices can feel overwhelming, especially when balancing aesthetics, function, and budget. Start by identifying your top 3-5 pain points in your current kitchen:
- Insufficient counter space?
- Disorganized cabinets?
- Poor lighting?
- Outdated appliances?
Focus your efforts and budget on solutions that address these specific issues first.
If you’re not sure what to change first, I can help you look at the space planning, layout, storage, finishes, and renovation decisions together. After almost 20 years in interior design, I’ve seen how much easier it is to make decisions when you understand what is causing the problem in the first place.
Reach out for a free consultation at 408-306-5003, and we can take it from there.
Your Quick Recap
Small kitchens are the most demanding rooms to design well because every mistake is visible and every wasted inch hurts. But they also reward good decisions faster than any other room. A few well-chosen upgrades can make a 70-square-foot kitchen feel like a professional workspace.
- Ceiling-height cabinets are the single highest-ROI storage upgrade in a small kitchen
- Light colors do real work - they are not just aesthetic, they affect how large the room feels
- Layered lighting removes shadows and makes the kitchen feel bigger without touching a wall
- Reflective surfaces - glossy tile, high-sheen paint, glass fronts - bounce light and add perceived depth
- Two-toned cabinetry adds visual interest and makes the upper half feel lighter and more open (bonus insight)
- For Airbnb kitchens, clear labeling of storage zones directly improves guest reviews (bonus insight)
If you're still feeling stuck and haven't been able to move things forward, let's talk! Reach out for a free consultation at 408-306-5003, and we can take it from there.
Frequently Asked Questions
What is the best layout for a small kitchen?
Galley and L-shaped layouts typically work best because they maximize counter space and create efficient workflow. The ideal choice depends on your room dimensions and whether you cook alone or with others.
How can I make my small kitchen look bigger?
Use light colors on cabinets and walls, install reflective backsplashes, and layer lighting with task and ambient sources. Extending cabinets to the ceiling, choosing minimal hardware, and reducing visual clutter through smart storage also create a more spacious feel.
Should I choose open shelving or closed cabinets in a small kitchen?
Most designers recommend a mix. Use open shelving for frequently-used items and attractive dishware to keep the space feeling light, with closed cabinets for everything else to hide clutter and reduce visual weight.
What size appliances should I buy for a small kitchen?
Common apartment-sized options include 24-inch ranges, 18-inch dishwashers, and counter-depth refrigerators. However, only downsize if you truly need the extra space. Standard appliances often provide better functionality and value, so measure carefully and consider your actual cooking needs before choosing compact models.
How much does it cost to remodel a small kitchen?
A basic small kitchen remodel typically costs $15,000-$25,000, including cabinet refacing or painting, entry-level countertops, and basic appliance updates. Mid-range remodels with semi-custom cabinets and better finishes run $25,000-$45,000. Costs vary based on your location, material choices, and scope of work.
Can I have an island in a small kitchen?
You can if you maintain proper clearances. You need 42-48 inches of space on all sides of an island for comfortable movement. If your kitchen can't accommodate these clearances, consider a narrow island (24-30 inches deep), a mobile cart, or a peninsula attached to existing cabinetry instead.