These compact spaces must deliver full functionality while remaining visually appealing, with no room for wasted choices. Every cabinet configuration, color decision, and lighting layer either makes the most of the space or compounds its limitations.
This guide covers practical small-kitchen solutions for both scenarios: budget-friendly upgrades that leave no trace and permanent design decisions that transform cramped quarters into efficient cooking spaces.
Your Quick Summary
- Galley and L-shaped layouts maximize workflow without sacrificing movement space
- Ceiling-height cabinets increase storage capacity by 30-40% compared to standard 36-inch units
- Light colors and reflective surfaces make rooms feel up to 22% larger
- Compact appliances free up counter space while maintaining full functionality
- Layer ambient, task, and accent lighting to eliminate shadows and expand space
Understanding Small Kitchen Dimensions and Layout Options
The NKBA formally defines a small kitchen as under 150 square feet, but the truly challenging spaces fall below 70 square feet, roughly 7×10 feet or smaller.
In urban multifamily buildings, kitchens frequently compress to 55–75 square feet to accommodate studio and micro-apartment floor plans.
Context matters. A 100-square-foot kitchen feels spacious in a 600-square-foot apartment but cramped in a 2,500-square-foot house. The defining characteristic isn't just total area; it's limited counter space, minimal storage, and tight work zones.
I usually look at what feels tight first: the walkway, the counter space, the sink area, and where things pile up. That tells you more than the square footage alone. .
Once you understand your space constraints, choosing the right layout becomes critical. Below are 3 best layouts to consider.
Galley Layout: Best for Narrow Kitchens
If you are not sure which layout makes sense, I would start with how you actually move through the kitchen. Where do you prep, where do you set groceries down, and what path do you take from the refrigerator to the sink or stove?
Parallel counters create a natural work zone, ideal for narrow spaces. The optimal galley width is 7–8 feet, allowing standard 24-inch-deep cabinets on both sides while maintaining the critical 42-inch work aisle.
This layout excels in spaces under 70 square feet because it eliminates wasted circulation area. Every step serves a purpose.
L-Shaped Layout: Corner Maximizer
This configuration wraps two adjacent walls, typically working best in 8×10 to 10×12 kitchens (80–120 square feet). The perpendicular arrangement opens sightlines to adjacent rooms and creates a natural work triangle. The corner becomes prime real estate when you add a lazy Susan or magic corner system.
One-Wall Layout: The Studio Solution
When width is severely limited, a single-wall layout (8–10 linear feet) concentrates all functions along one wall. This works for micro-apartments where the kitchen must share space with living areas. Pair with a rolling cart or fold-down table for temporary workspace.
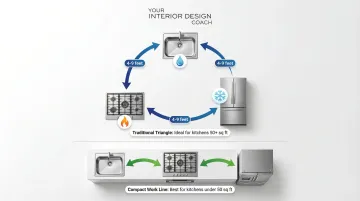
The Work Triangle Rule (and When to Break It)
The classic work triangle, connecting sink, stove, and refrigerator within 4–9 feet of each other, remains sound guidance for most kitchens. In spaces under 50 square feet, however, a "work line" often works better. The goal shifts from triangular efficiency to linear flow, with everything within arm's reach along a single counter run.
Maximizing Vertical Storage and Cabinet Solutions
Take Cabinets All the Way to the Ceiling
Standard 36-inch wall cabinets leave a gap of empty air below the ceiling. According to NKBA Kitchen Planning Guidelines, ceiling-height cabinets (typically 42 inches tall) increase shelf frontage from 1,000 to 1,400 inches - a 40% storage gain without touching the floor plan. That additional volume holds seasonal items, specialty appliances, or bulk pantry goods that would otherwise crowd the accessible shelves below.
Practical considerations:
- Store rarely-used items on top shelves (holiday platters, extra serving bowls)
- Keep a compact step stool in a toe-kick drawer for easy access - the storage you actually use regularly stays where you can reach it without moving anything
- Standard 36-inch cabinets cost $150–$300 each; 42-inch versions run $180–$350, a modest premium for substantial storage gains
Strategic Open Shelving vs. Closed Cabinets
Open shelving reduces visual bulk, making walls appear to recede. The tradeoff: exposed items require disciplined organization to avoid cluttered appearance.
Hybrid approach (recommended):
- Open shelves for everyday dishes and glassware (keeps items accessible)
- Closed cabinets for food storage, cleaning supplies, and mismatched items
- Limit open shelving to one wall or upper section to maintain visual calm
This balanced approach aligns with current design trends. Recent NKBA research shows growing preference for clutter reduction and seamless design, indicating the pendulum is swinging back toward concealed storage while maintaining strategic open displays.
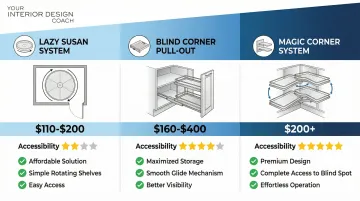
Corner Solutions That Actually Work
Corner cabinets typically waste space. Modern hardware transforms these voids into active storage:
- Lazy Susan systems: Rotating trays bring items forward; cost $110–$200
- Blind corner pull-outs: Slide shelves extract from deep corners; cost $160–$400
- Magic corner systems: Articulating shelves fully extend contents; cost $200+ depending on complexity
For renovators investing in custom cabinetry, magic corners deliver the highest capacity return, making previously inaccessible space fully functional.
Hidden and Pull-Out Storage Ideas
Beyond corners, other hidden spaces offer storage potential. Toe-kick drawers reclaim the 4–6 inch plinth space beneath base cabinets, perfect for flat items like baking sheets, cutting boards, or table linens.
Additional hidden storage:
- Slim pull-out pantries (6–12 inches wide) fit between appliances or at cabinet ends
- Install vertical dividers to prevent stacking chaos with baking sheets and cutting boards
- Narrow spice pull-outs (3–4 inches wide) make use of gaps too small for standard cabinets
- Tambour-door appliance garages conceal toasters and coffee makers while keeping them accessible
Wall-Mounted Storage for Renters
Damage-free solutions deliver function without forfeiting security deposits:
- Command hooks (rated for 3–5 lbs) hold utensils, oven mitts, and lightweight tools
- Magnetic knife strips mount with heavy-duty adhesive strips (no screws required)
- Adhesive spice racks attach inside cabinet doors
- Tension rods inside cabinets create vertical dividers for pan lids or cleaning supplies
- Removable pegboard systems lean against walls or mount with minimal hardware
Color, Material, and Visual Tricks to Expand Space
The Light and Bright Color Palette Strategy
Light colors reflect more light, making rooms measurably feel larger. Research published in the Journal of Environmental Psychology found that increasing wall lightness can improve perceived room size by approximately 22% - which is not a small perceptual shift. This principle translates directly into paint and finish choices that transform cramped kitchens without touching the architecture. What I've seen with clients is that the right palette makes the daily experience of being in the kitchen noticeably less tiring - the space stops fighting you.
Effective palette choices include:
- Whites with high Light Reflectance Values (LRV, which measures how much light a color reflects): Simply White, Alabaster, Chantilly Lace
- Soft grays: Repose Gray, Agreeable Gray, Pale Oak
- Pale blues and greens: Sea Salt, Rainwashed, Quiet Moments
Color drenching technique: Paint cabinets, walls, and ceiling the same light hue to blur boundaries and eliminate visual breaks that fragment space.
Reflective and Glossy Surfaces
Beyond paint color, your material choices amplify the space-expanding effect. Glossy cabinet finishes, glass tile backsplashes, and polished countertops bounce light around the room, increasing both natural and artificial illumination. The more reflective surfaces you incorporate, the brighter and larger your kitchen appears.
High-impact reflective elements include:
- Glossy or semi-gloss cabinet paint (instead of matte)
- Glass subway tile or mirrored backsplash (maintenance-intensive but visually dramatic)
- Quartz or granite with polished finish
- Stainless steel appliances and fixtures
The "countersplash" trend (extending countertop material up the wall) creates visual continuity that makes walls appear taller and space more cohesive.
Strategic Use of Pattern and Contrast
Bold patterns work in small kitchens when you use them sparingly as focal points. A colorful backsplash or single accent wall draws the eye without overwhelming.
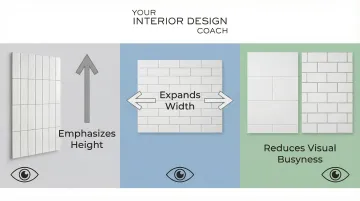
Pattern orientation matters:
- Vertical subway tile or shiplap draws eyes upward, emphasizing ceiling height
- Horizontal patterns can make narrow galley kitchens feel wider
- Large-scale patterns (12×24 tile instead of 3×6) reduce visual busyness
Transparent and Slim-Profile Elements
Reduce visual weight with see-through and minimal elements:
- Glass-front cabinet doors (especially upper cabinets near windows)
- Acrylic or ghost chairs at small tables
- Slim-profile hardware (bar pulls instead of chunky knobs)
- Integrated appliances that blend with cabinetry
- Floating shelves with hidden brackets (instead of bulky visible supports)
Lighting Strategies That Transform Small Kitchens
Layered Lighting Makes the Difference
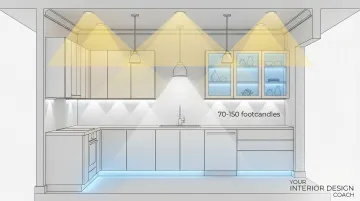
The Illuminating Engineering Society (IES) and NKBA recommend three distinct lighting layers:
- Ambient: General illumination from recessed cans, flush-mount fixtures, or central pendants
- Task: Focused light on work surfaces: under-cabinet strips, pendant lights over sinks
- Accent: Decorative lighting that adds depth: toe-kick LEDs, inside glass cabinets
Proper lighting makes a space feel up to 50% larger while eliminating shadows that create a cave-like atmosphere. For detailed task work like chopping and measuring, IES recommends 70–150 footcandles of illumination.
Under-Cabinet Task Lighting
LED strip lights provide uniform, shadow-free illumination on countertops, which is essential for safe food prep and eliminates the frustrating shadows created by overhead lighting alone.
Options by installation type:
- Plug-in systems: $30–$80, renter-friendly with no electrical work (cords visible)
- Hardwired systems: $45–$110 plus installation, cleaner look but requires electrician
Color temperature: Choose 3000K (neutral white) to 4000K (cool white) for optimal visibility and color rendering when cooking.
Maximize Natural Light
Natural light remains the most effective (and budget-friendly) way to make a small kitchen feel larger. Beyond task lighting, maximizing daylight transforms how the entire space feels throughout the day.
Strategies to amplify daylight:
- Remove or shorten window treatments (cafe curtains, roman shades vs. floor-length panels)
- Install glass-front upper cabinets near windows to allow light penetration deeper into room
- Position mirrors or reflective backsplashes opposite windows to bounce light across space
- Keep window sills clear of clutter and large plants that block rays
If you’re feeling stuck because your small kitchen needs better light, more storage, and a layout that actually works, I can help you figure out what to change first. Reach out for a free consultation at 408-306-5003, and we can take it from there.
Renter-Friendly Small Kitchen Upgrades
Temporary Backsplash and Surface Solutions
Peel-and-stick tiles and removable wallpaper deliver visual impact without permanent installation.
| Solution | Cost per Sq Ft | Notes |
|---|---|---|
| Peel-and-stick vinyl/gel tiles | $12–$15 | Removable, renter-friendly |
| Traditional ceramic tile (installed) | $45–$60 | Permanent installation |
| Removable wallpaper | $3–$5 | Easy application and removal |
Peel-and-stick materials aren't heat-resistant, so avoid placing them directly behind gas ranges. Use them on walls next to or above the cooktop instead.
For countertops, contact paper or butcher block toppers refresh dated surfaces without demolition. Remove before move-out to avoid damage penalties.
Portable and Removable Storage
Beyond surface treatments, functional storage solutions maximize space without permanent modifications. Freestanding options add capacity without drilling holes:
- Rolling carts with butcher block tops (mobile workspace and storage)
- Over-the-door organizers for pantry items or cleaning supplies
- Freestanding wire shelving units (adjustable and portable)
- Magnetic wall systems for knives and tools
- Tension rod dividers inside cabinets for vertical pan storage
Lighting and Hardware Swaps
Once storage is in order, small finishing touches complete the transformation:
- Swap cabinet knobs and pulls (save originals in labeled bag for reinstallation)
- Plug-in pendant lights or swag fixtures (no hardwiring required)
- Battery-operated or plug-in LED strip lights under cabinets
- Clip-on task lights for focused work areas
Common Small Kitchen Design Mistakes to Avoid
Oversized Furniture and Appliances
Standard 30-inch ranges and 36-inch refrigerators can overwhelm tight spaces, but compact alternatives save 6-12 inches without sacrificing functionality:
| Appliance | Standard Width | Compact Width | Space Saved |
|---|---|---|---|
| Range | 30 inches | 20–24 inches | 6–10 inches |
| Dishwasher | 24 inches | 18 inches | 6 inches |
| Refrigerator | 30–36 inches | 24 inches | 6–12 inches |
Island clearance: Islands require minimum 36–42 inches of clearance on all sides. In spaces under 70 square feet, permanent islands usually block traffic flow. Consider rolling carts or fold-down tables instead.

Too Much Visual Clutter
Open countertops crowded with small appliances, dish racks, and decor create visual chaos. Small kitchens demand discipline. Every item on display should earn its spot.
Effective clutter-reduction strategies:
- Apply "one-in, one-out" rule for kitchen gadgets
- Use appliance garages or cabinets for toasters, blenders, and coffee makers
- Create a landing zone outside the kitchen for mail, keys, and personal items
- Do a daily countertop reset, keeping only 2-3 essentials visible
Ignoring the Vertical Dimension
Stopping cabinets at 36 inches when ceilings reach 8–10 feet wastes 30-40% of potential storage. Blank walls miss opportunities for hooks, magnetic strips, and floating shelves.
Vertical mistakes to avoid:
- Leaving 12–18 inches of empty space above cabinets
- Failing to use wall space between counter and upper cabinets
- Installing pot racks in kitchens with ceilings below 8 feet (creates cramped feeling)
Maximizing vertical space requires looking up, literally assessing every wall from floor to ceiling for untapped storage potential.
When to Call in a Design Coach
Small kitchen design presents unique challenges. Every inch matters, and mistakes carry bigger consequences in compact spaces.
Professional guidance helps when you're:
- Stuck choosing between conflicting layout options
- Unsure how to maximize awkward spaces
- Overwhelmed by the sheer number of decisions
Small kitchens are easy to overthink because every choice affects something else. A cabinet change affects storage, a lighting choice affects how open the room feels, and one oversized appliance can throw off the whole layout.
If you're feeling stuck on the design decisions for your kitchen, I can help you sort through what is actually causing the problem and what is worth changing first, whether you are working around rental limits, a tight budget, or a full renovation.
Your Quick Recap
Small kitchens punish wasted decisions and reward smart ones. The functional principles here are universal - the difference between a temporary fix and a permanent renovation is just which tools are available to you. Start with what you can do before worrying about what you cannot.
- The vertical space above your cabinets is not dead space - it is 30-40% more storage waiting to happen
- Light colors and reflective surfaces are not just aesthetic choices; they measurably affect perceived room size
- Corner storage is where most small kitchens quietly lose 30% of their capacity
- Layered lighting eliminates the cave-like feeling that makes small kitchens feel smaller than they are
- Renters can accomplish most of these improvements with removable, damage-free solutions (bonus insight)
- The color-drenching technique, same hue on walls, cabinets, and ceiling, blurs boundaries and opens up space (bonus insight)
If you're still feeling stuck and haven't been able to move things forward, let's talk! Reach out for a free consultation at 408-306-5003, and we can take it from there.
Frequently Asked Questions
What is considered a small kitchen size?
Small kitchens typically measure under 70 square feet (roughly 7×10 feet or smaller), though the NKBA formally defines "small" as under 150 square feet. Context matters: what feels spacious in an apartment may feel cramped in a larger home.
What colors make a small kitchen look bigger?
Light neutrals (whites, soft grays, pale blues, and warm beiges) reflect more light and can increase perceived room size by up to 22%. Painting cabinets, walls, and ceiling the same light color blurs boundaries and maximizes the expansion effect.
Should I use open shelving in a small kitchen?
A hybrid approach works best: use open shelves for frequently accessed items like everyday dishes, and closed cabinets for food storage and clutter-prone items. Limit open shelving to one wall to maintain visual calm.
Can I put an island in a small kitchen?
Islands need 36–42 inches of clearance on all sides, which blocks traffic in kitchens under 70 square feet. Better alternatives include rolling carts, narrow peninsulas attached to one wall, or fold-down tables.
How do I maximize storage in a small kitchen?
Install ceiling-height cabinets (40% more capacity), add corner solutions like lazy Susans, use toe-kick drawers beneath base cabinets, fit pull-out pantries in narrow gaps, and mount wall racks. Make every vertical surface work.
What are the best layouts for small kitchens?
Galley layouts excel in narrow spaces, L-shaped configurations maximize corners in 8×10 to 10×12 rooms, and one-wall layouts work for micro-apartments under 60 square feet. The best choice depends on your dimensions and door locations.