Removing walls doesn't automatically create a functional, beautiful space. Many people struggle with:
- Defining separate zones without physical barriers
- Managing visual clutter when the kitchen is always on display
- Controlling noise and cooking odors that travel freely
In my experience, the spaces that work best are the ones where layout decisions came first - before paint colors, before furniture shopping, before anything else. Here you'll find 15 practical design ideas to create an open-concept kitchen-dining area that's both beautiful and livable, addressing these challenges while getting the most from the benefits.
Your Quick Summary
- Open-concept layouts enhance natural light, social connection, and can boost resale value by up to 7%
- Define clear zones using strategic islands, lighting, and furniture placement
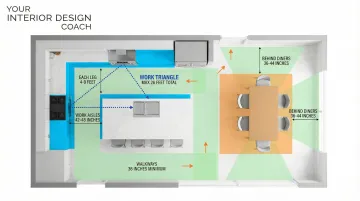
- Maintain 42-48" work aisles and 36-44" clearance behind diners
- Cohesive color schemes and repeated materials create visual unity across both spaces
- Design guidance prevents costly layout mistakes before construction begins
Why Open-Concept Kitchen-Dining Spaces Work
Removing the wall between your kitchen and dining area does more than update the aesthetic - it fundamentally changes how you interact with people in your home.
Enhanced Flow and Interaction
Open layouts remove the barrier that traditionally separated the cook from family and guests. You can prepare meals while helping kids with homework, entertaining friends, or watching TV.
This setup supports modern lifestyles where kitchens have evolved from purely functional workspaces into social hubs.
Measurable Benefits
The advantages extend beyond convenience:
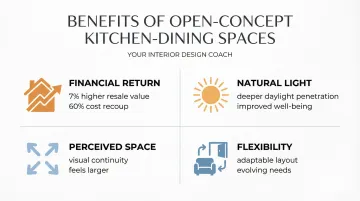
- Financial return: Homes with open-concept layouts attract 7% higher resale offers, and kitchen remodels typically recoup approximately 60% of costs
- Natural light: Unobstructed sightlines allow daylight to penetrate deeper into your home, positively impacting physical and psychological well-being
- Perceived space: Visual continuity makes even modest homes feel substantially larger
- Flexibility: Without fixed walls, you can easily rearrange furniture and adapt the space as your needs evolve
These practical benefits translate to real satisfaction. The National Association of Realtors gives kitchen upgrades a perfect "Joy Score" of 10 out of 10.
When you combine good functionality with the open-concept advantage, you're creating a space that genuinely improves daily life. If you're stuck on how to plan your kitchen-dining layout before committing to changes, call 408-306-5003 for a free consultation - we can help you work through the decisions with confidence.
15 Open-Concept Kitchen and Dining Design Ideas
Layout and Spatial Planning Ideas
Design Idea 1: Use a Kitchen Island as a Natural Divider
A well-positioned island creates the perfect balance, separating kitchen and dining zones without blocking visual connection or conversation. The island becomes a functional boundary that defines the cooking area while maintaining the open feel.
Why it works:
- Adds 15-25 square feet of prep space for meal preparation
- Offers storage underneath for cookware, small appliances, or pantry items
- Creates casual seating on the dining side for quick meals or homework
- Establishes natural traffic flow around (not through) the work zone
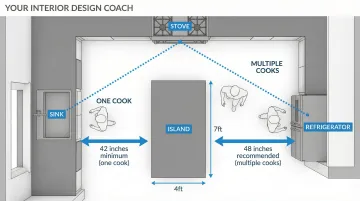
Critical measurement: Maintain at least 42 inches between the island and perimeter counters for one cook, or 48 inches for multiple cooks, according to National Kitchen & Bath Association (NKBA) guidelines. Less than 42 inches and you'll be turning sideways every time someone opens the oven - which feels minor until you're cooking daily in that space and the kitchen starts to feel like an obstacle course rather than a gathering point.
Position your island perpendicular to the main kitchen run to maximize its dividing effect while keeping sightlines open to the dining area.
Design Idea 2: Create an L-Shaped or U-Shaped Kitchen Layout
These classic configurations naturally define the cooking zone while keeping it open to the dining area. The perpendicular counter runs create a contained workspace that doesn't require a full wall.
L-shaped layouts:
- Open one full side to the dining area
- Create efficient work triangle between sink, stove, and refrigerator
- Work well in smaller to mid-sized spaces
- Form a natural corner for dining table placement
U-shaped layouts:
- Maximize counter and storage space
- Contain cooking activity on three sides
- Suit serious cooks who need extensive prep areas
- Require minimum 60 inches between opposing arms to prevent cramped feel
Both layouts keep the cook facing outward toward the dining area, enabling conversation and supervision while working.
The key is ensuring your work triangle (the path between sink, stove, and refrigerator) doesn't exceed 26 feet total, with each leg between 4 and 9 feet.
Design Idea 3: Position the Dining Table Perpendicular to the Kitchen
Rather than placing your dining table parallel to the kitchen counters, turn it perpendicular. This simple orientation shift creates natural flow and conversation opportunities while maintaining distinct zones.
Key benefits:
- Diners face the kitchen, making conversation with the cook natural
- Creates clear visual separation between cooking and eating areas
- Traffic flows around (not between) the two zones
- Serving becomes easier, with fewer steps from stove to table
Clearance requirements: Allow 36-44 inches between the table edge and kitchen island or counters for comfortable passage. If traffic flows behind seated diners, you need at least 44 inches; for wheelchair accessibility, aim for 60 inches.
This arrangement works particularly well when combined with a kitchen island. The island and table form a parallel relationship that visually balances the space.
Design Idea 4: Use a Peninsula Instead of an Island
When your space is too narrow for an island (which requires significant clearance on all sides), a peninsula delivers similar benefits while taking up less room. A peninsula extends from your existing cabinetry, creating a partial divider without consuming floor space.
When to choose a peninsula:
- Rooms narrower than 12-13 feet
- Galley-style kitchens opening to dining areas
- When you need maximum counter space with minimal footprint
- Homes with challenging traffic patterns
Functional advantages:
- Delivers the same prep space and storage as an island
- Accommodates casual seating on the dining side
- Needs clearance on only three sides instead of four
- Houses electrical outlets and plumbing more easily than islands
Minimum clearance: Maintain 40 inches between the peninsula and opposing counters for basic accessibility, though we recommend 48 inches for comfortable multi-cook use.
Creating Visual Cohesion
Design Idea 5: Implement a Consistent Color Palette Throughout
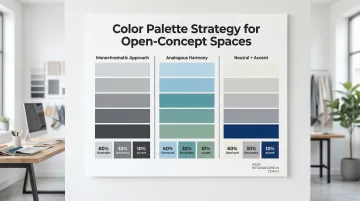
Color creates unity in open-concept spaces because the eye travels the entire visible area at once. Choose 2-3 main colors that flow seamlessly from kitchen cabinetry through dining furniture and accessories - jarring transitions in a shared sightline make the space feel smaller and less intentional.
Effective color strategies:
- Monochromatic approach: Use varying shades of one color family (light gray cabinets, charcoal dining chairs, soft gray walls) - a single consistent tone across both zones is what makes the combined space feel designed rather than assembled
- Analogous harmony: Select colors adjacent on the color wheel (blues flowing into greens, or warm beiges into soft oranges)
- Neutral base with accent: White or gray throughout, with the same accent color (navy, emerald, or terracotta) repeated in both zones
Application tips:
- Kitchen cabinet color should complement (not necessarily match) dining chairs
- Repeat your accent color in 3-5 places across both spaces
- Use the 60-30-10 rule: 60% dominant color, 30% secondary color, 10% accent
Avoid jarring transitions. If your kitchen features warm wood tones, cool gray dining furniture will create visual discord. Instead, bridge the two with a transitional element like a wood-topped island or warm-toned area rug.
Design Idea 6: Repeat Materials Across Both Spaces
Repeating materials unifies the space. When the eye recognizes familiar textures and finishes throughout, the entire area feels cohesive.
Material repetition strategies:
- Wood tones: If your kitchen has walnut cabinets, incorporate walnut in the dining table, chair legs, or sideboard
- Metal finishes: Match kitchen hardware (cabinet pulls, faucet) to dining light fixture and chair frames: all brushed nickel or all matte black
- Countertop materials: Use your kitchen quartz or granite on a dining sideboard or bar cart
Practical examples:
- Marble kitchen backsplash + marble-topped dining console
- Brass kitchen faucet + brass dining chandelier + brass cabinet hardware
- White oak kitchen island + white oak dining table
- Black steel kitchen shelving + black steel dining chair frames
You don't need to match everything perfectly. In fact, exact matches can feel forced. Instead, aim for family resemblance: similar wood species, coordinating metal finishes, or complementary stone patterns.
Design Idea 7: Use Flooring to Define Zones
Flooring can help separate the kitchen and dining area without making them feel like two disconnected spaces. I would recommend choosing materials that work together so the change feels intentional rather than distracting. You have two main approaches: transitioning between materials or using area rugs.
Material transitions:
- Kitchen (durable): Porcelain tile, luxury vinyl plank, or sealed concrete
- Dining (warmer): Hardwood, engineered wood, or wood-look tile
- Transition strips: Use T-molding for surfaces of similar height or reducer strips for height differences to prevent tripping hazards
- Grout coordination: When adjacent areas use tile, match grout width and color for visual continuity
Area rug approach: If you prefer continuous flooring throughout, use an area rug to anchor the dining zone. The rug should extend 24-30 inches beyond all sides of the table when chairs are pulled out, ensuring chair legs remain on the rug during use.
Best practices:
- Maintain the same flooring direction throughout for maximum visual expansion
- If using different materials, keep them in the same color family
- Avoid busy patterns in one zone and solid colors in another; maintain consistent visual weight
Design Idea 8: Install Coordinating but Varied Lighting Fixtures
In an open layout, I pay a lot of attention to where the light is coming from. A light over the table helps the dining area feel more intentional, while softer kitchen lighting keeps the whole room from feeling too harsh at night.
Coordination strategies:
- Shared finish: Brushed brass pendants over the island + brushed brass chandelier over the table
- Similar shape: Round kitchen pendants + round dining chandelier in different sizes
- Same era: Mid-century modern fixtures throughout in varying styles
- Consistent material: All glass fixtures: clear over the kitchen, smoked over the**** dining
Functional lighting layers: According to Illuminating Engineering Society (IES) standards, different zones require different light levels:
- Kitchen task areas: 50 footcandles for prep counters
- Dining surface: 10-20 footcandles for ambient dining
- General ambient: 5-10 footcandles throughout
Install dimmer switches on dining fixtures to adjust mood for different occasions: bright for family dinners, dimmed for intimate gatherings.
Avoid: Identical fixtures in both zones (lacks definition) or completely mismatched styles (breaks cohesion).
Functional Solutions
Design Idea 9: Incorporate Multi-Level Seating Options
Combining bar stools at the island with dining chairs at the table accommodates different activities and group sizes, making your space more versatile.
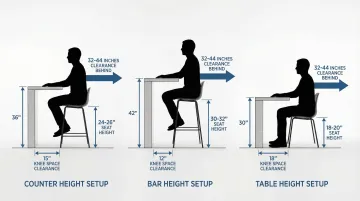
Height and clearance requirements:
| Counter Height | Seat Height | Required Knee Space | Clearance Behind |
|---|---|---|---|
| 36" (counter) | 24-26" | 15" deep | 32-44" |
| 42" (bar) | 30-32" | 12" deep | 32-44" |
| 30" (table) | 18-20" | 18" deep | 32-44" |
Source: NKBA Guidelines
Functional advantages:
- Island seating: Quick breakfasts, homework, casual conversations while cooking
- Table seating: Formal meals, projects requiring spread-out space, larger gatherings
- Flexibility: Overflow seating when entertaining: some guests at the island, others at the table
Design cohesion tips:
- Coordinate materials: wood island stools + wood dining chairs
- Match or complement colors: navy stools + navy dining chair cushions
- Keep style consistent: all modern, all traditional, or all transitional
Allow 24 inches of counter width per stool and ensure stools can tuck completely under the counter overhang when not in use.
Design Idea 10: Add a Buffet or Sideboard Between Spaces
A buffet or sideboard positioned between kitchen and dining areas provides storage and serving space while creating gentle visual separation, without blocking sightlines or conversation.
Placement options:
- Position perpendicular to the kitchen, creating an "L" with your counters
- Place behind or beside the dining table as a serving station
- Use it to define the edge of the dining zone without a full wall
Functional benefits:
- Stores dining essentials: linens, serving pieces, extra dishware
- Provides surface for serving buffet-style meals
- Displays decorative items that add personality
- Houses small appliances used occasionally (coffee maker, slow cooker)
Height considerations: Standard buffets (32-36 inches tall) work well for serving but won't obstruct views. Taller hutches (60+ inches) provide more storage but create more visual separation; choose based on how much definition you want.
Select a piece that coordinates with both your dining table and kitchen cabinetry in terms of wood tone, finish, and style.
Design Idea 11: Use Open Shelving as a Transitional Element
Open shelving visible from both kitchen and dining areas creates visual connection while displaying attractive dishware, glassware, or decorative objects. It's lighter than upper cabinets and maintains the open feel.
Placement options:
- Replace upper cabinets on the dining-facing wall
- Install floating shelves on a short pony wall between zones
- Create a floor-to-ceiling shelving unit that acts as a partial divider
What to display:
- Coordinated dishware sets in complementary colors
- Glassware and stemware that catch light
- Cookbooks with attractive spines
- Decorative bowls, vases, or pottery
- Small plants or herbs in attractive containers
Practical considerations:
- Keep 15-18 inches between shelves for dinner plates
- Use 12-inch-deep shelves for standard dishware
- Install at least two shelves to create visual impact
- Choose items that look good from both sides
Maintenance reality: Open shelving requires regular dusting and organization. If you prefer low-maintenance, limit open shelving to one wall and use closed cabinets elsewhere.
Design Idea 12: Create a Breakfast Nook Within the Open Space
A built-in banquette or cozy corner provides casual dining without disrupting the open feel. It's perfect for everyday meals, freeing your main dining table for formal occasions or other uses.
Design approaches:
- L-shaped banquette: Built into a corner with a small table
- Window seat dining: Capitalize on natural light with seating along windows
- Partial wall nook: Use a short pony wall (42-48 inches) to create definition
Space requirements:
- Minimum 24 inches from table edge to wall for comfortable seating
- 18-inch seat depth for built-in benches
- 30-inch table height pairs with 18-inch seat height
Advantages:
- Maximizes seating in less space than chairs (no clearance needed behind)
- Provides storage in the base of built-in benches
- Creates a cozy, defined zone within the larger open space
- Best for casual meals, morning coffee, or extra seating near the kitchen
Add cushions and throw pillows that coordinate with your main dining area to maintain visual cohesion.
Decorative and Finishing Touches
Design Idea 13: Hang a Statement Light Fixture Over the Dining Table
A dramatic chandelier or pendant cluster serves as a focal point, anchoring the dining area and drawing the eye, clearly defining the eating area within the open space.
Sizing guidelines:
- Diameter: Measure table width and length in inches, add them together, and convert to inches for fixture diameter (60" + 40" table = 100" combined ÷ 2 = 50" fixture)
- Height: Hang 30-36 inches above the table surface
- Room proportion: Fixture should be ½ to ⅔ the table width
Style selection: Choose a fixture that's more decorative than your kitchen lighting but shares a common element (finish, material, or era). If you have simple glass pendants over the kitchen island, consider an elaborate glass chandelier over the dining table.
Functional note: Install on a dimmer switch to adjust lighting for different occasions: brighter for family meals, dimmed for intimate dinners.
Design Idea 14: Use Artwork and Décor to Define Areas
Art, mirrors, and wall décor create focal points that define separate zones without physical barriers.
Dining area focal points:
- Large-scale artwork (48-60 inches wide) centered behind the dining table
- Oversized mirror that reflects light and expands the space
- Gallery wall of coordinated frames
- Decorative wall shelf displaying curated objects
Kitchen area options:
- Smaller-scale art above a sideboard or buffet
- Floating shelves with decorative objects
- Vintage signs or typography that adds personality
Placement principles:
- Hang artwork 57-60 inches to center (gallery standard)
- Artwork should be ⅔ to ¾ the width of furniture below it
- Maintain visual balance: if one wall is busy, keep others simpler
Choose pieces that complement your color palette and style, creating cohesion while defining each zone's purpose.
Design Idea 15: Incorporate Plants and Greenery as Natural Dividers
Tall potted plants or a plant shelf adds life, color, and subtle separation between kitchen and dining areas. Plants soften hard surfaces and improve air quality while serving as organic dividers.
Effective plant strategies:
- Floor plants: 4-6 foot tall specimens (fiddle leaf fig, bird of paradise, snake plant) positioned between zones
- Plant stands: Elevate medium plants to eye level for more visual impact
- Hanging planters: Suspend from ceiling at the boundary between spaces
- Plant shelf: Install a narrow shelf at counter height with trailing plants
Best plants for kitchens:
- Low-light tolerant: pothos, snake plant, ZZ plant
- Humidity-loving: ferns, peace lily
- Edible: herbs in attractive containers
Placement tips:
- Position tall plants where they'll partially obstruct sightlines, creating gentle definition
- Use odd numbers (1, 3, or 5 plants) for visual appeal
- Repeat the same plant species in different sizes for cohesion
- Ensure plants won't interfere with traffic flow (maintain 36-inch walkways)
Choose containers that coordinate with your color scheme and material palette: ceramic in your accent color, woven baskets for texture, or metallic pots that match your hardware finishes.
How to Successfully Implement Your Open-Concept Design
Turning these 15 ideas into a functional, beautiful space requires careful planning. Here's what you need to know before you start.
Traffic Flow and Clearances
The most common mistake in open-concept design is inadequate spacing. The NKBA establishes specific minimums:
- Work aisles: 42 inches minimum for one cook, 48 inches for multiple cooks
- Walkways: 36 inches minimum for comfortable passage
- Behind seated diners: 36 inches to edge past, 44 inches to walk past comfortably
- Island to dining table: 36-48 inches depending on traffic patterns
Your work triangle (sink, stove, refrigerator) should total no more than 26 feet, with each leg between 4-9 feet. This ensures efficiency without excessive walking.
Managing Practical Challenges
Open concepts eliminate the barriers that contained noise and odors. This means you'll need mechanical solutions to manage these issues.
Ventilation requirements:
- Install a range hood with minimum 100 CFM (cubic feet per minute) airflow, per ASHRAE 62.2 standards
- Choose a fan rated at ≤3 sones so it's quiet enough you'll actually use it
- Vent to the exterior when possible rather than recirculating
Noise control:
- Use ceiling tiles or panels with NRC (Noise Reduction Coefficient) of 0.75-0.90 to absorb sound
- Add area rugs, upholstered furniture, and window treatments to reduce echo
- Consider a white noise machine or background music to mask kitchen sounds
Visual tidiness: Since your kitchen is always visible, plan for adequate closed storage to hide everyday clutter. Include at least one deep drawer for small appliances and a designated spot for mail, keys, and daily items.
The Value of Professional Guidance
With so many decisions to juggle (layout configuration, material selection, lighting placement, furniture sizing), it's easy to feel overwhelmed or make expensive mistakes.
What I've seen with clients is that the most common errors happen when layout decisions are made too late in the process. With almost 20 years of interior design experience, I know how much easier it is to talk through those choices early, before one decision starts affecting the rest of the space.
Whether you're stuck on layout decisions, need help expressing your vision, or want to make sure you have proper clearances and flow, professional coaching prevents costly errors. You'll end up with a space that truly works for your lifestyle.
If you haven't been able to move things forward on your own, reach out for a free consultation at 408-306-5003 and we can take it from there.
Your Quick Recap
- Open-concept kitchen and dining spaces look effortless in design magazines but feel chaotic when not carefully planned. What to keep in mind:
- Island placement is a layout decision before it is a design decision - clearances come first
- Pendant light placement over the dining table does more to define the dining zone than almost anything else
- Cohesive material choices across the kitchen and dining create unity without requiring matching furniture
- Zoning with different rugs is one of the most affordable ways to define spaces in an open layout
- Getting ventilation right is not optional in open kitchens - cooking smells travel and affect the dining experience (bonus insight)
- Open layouts that sell well have one thing in common: clear, well-defined zones that buyers can visualize themselves using (bonus insight)
The difference is almost always in the details: clearances that allow real movement, lighting that separates zones without closing them off, and a color story that ties two functional spaces into one coherent room.
If you’re still not sure how to bring your kitchen and dining area together, I can help you get unstuck. Reach out for a free consultation at 408-306-5003, and we can take it from there.
Frequently Asked Questions
Is an open plan kitchen a good idea?
Open-plan kitchens work well if you value social interaction and flexible space. Consider your cooking habits, noise sensitivity, and preference for separate formal spaces before committing.
What is the best kitchen layout for an open plan?
L-shaped and U-shaped layouts define the kitchen zone while maintaining openness. Islands add workspace without blocking sightlines; peninsulas work well in smaller spaces.
What is the 3x4 kitchen rule?
The 3x4 rule creates three work zones (cooking, cleaning, prep), each with approximately 4 feet of counter space. This prevents congestion when multiple people work simultaneously.
How much clearance do I need between my island and dining table?
Maintain 36-48 inches between your island and dining table. Use 36 inches for minimal traffic, 44 inches if people will walk past seated diners, and 48 inches for comfortable multi-directional flow.
Can I have different flooring in the kitchen and dining areas?
Yes, transitioning from tile in the kitchen to hardwood in the dining area is common. Use proper transition strips (T-molding or reducers) to prevent tripping hazards, and keep materials in the same color family for visual cohesion.
How do I control cooking smells in an open-concept layout?
Install a range hood with minimum 100 CFM airflow that vents to the exterior. Choose a model rated at 3 sones or less for quiet operation you'll actually use.